Creating custom chocolate packaging is an essential part of presenting your product to the world. It combines aesthetics with functionality, ensuring your chocolate stays fresh while reflecting your brand’s identity. Whether you’re a small business or a large brand, having the right packaging can elevate your product and attract more customers.
From selecting the right materials to designing the perfect look, each step in the chocolate packaging process plays a key role. This guide will take you through each stage, helping you create packaging that not only protects but also impresses. Let’s dive into the process of making chocolate packaging that stands out.
What is Chocolate Packaging Made of?
Chocolate packaging is made from a variety of materials, each chosen based on factors such as protection, aesthetic appeal, and sustainability. The right packaging ensures the product stays fresh, secure, and visually appealing.
Here’s a look at the common materials used in chocolate packaging and their benefits.
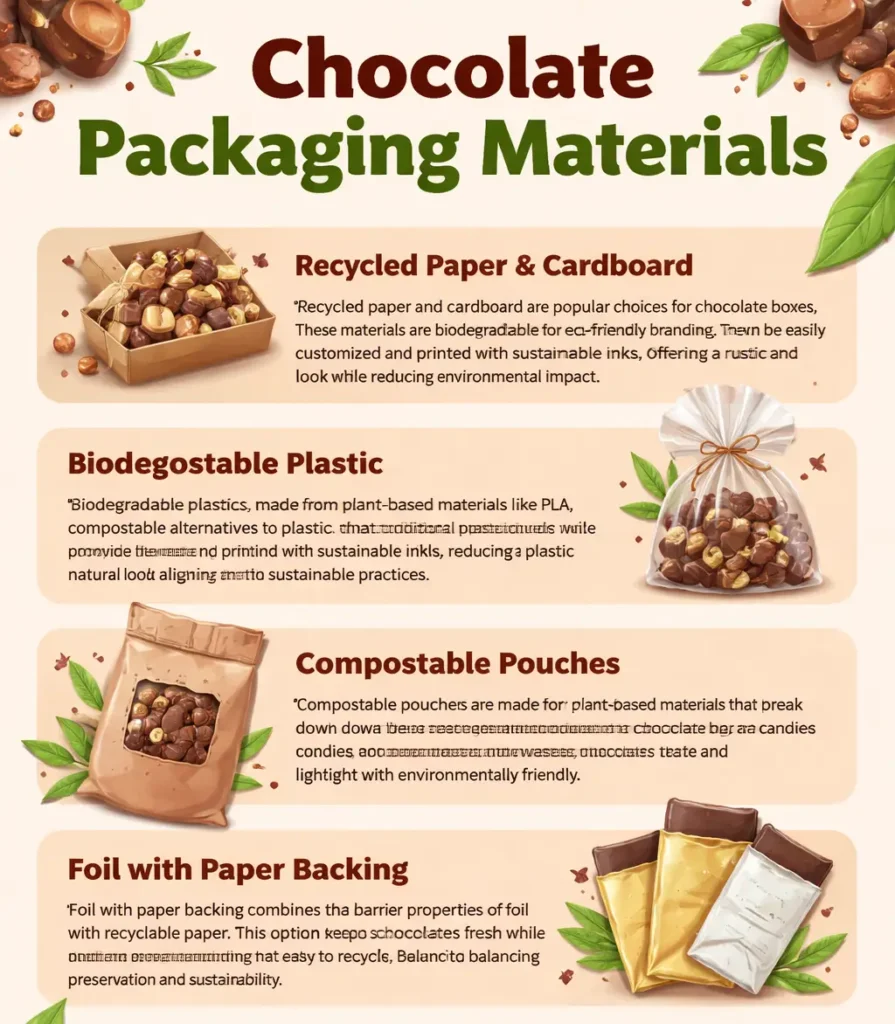
- Paper and Cardboard: Paper and cardboard are popular choices for chocolate packaging due to their versatility and recyclability. They can be easily printed on for branding purposes and provide a sturdy outer layer to protect chocolates during transit. These materials can be customized with different finishes, adding visual appeal while remaining eco-friendly.
- Plastic: Plastic is commonly used in chocolate packaging because of its durability and ability to protect the product from moisture and air. It is often used for wraps, trays, and containers that keep chocolates sealed and visible. Although plastic is effective, brands are now moving toward biodegradable options to reduce environmental impact.
- Aluminum Foil: Aluminum foil is frequently used to wrap individual pieces or bars of chocolate. It provides an airtight seal, which helps preserve the freshness and flavor of the chocolate. Additionally, foil can be easily molded to fit the product and is widely recyclable, making it a good option for eco-conscious brands.
- Glass: Glass packaging is often used for high-end or gourmet chocolates. It provides a premium look and feel while also offering great protection. Glass containers can be used for bulk chocolates or luxury gift packaging, and the transparent nature allows customers to view the product. Glass is also 100% recyclable.
- Eco-Friendly Materials: With a growing demand for sustainable packaging, eco-friendly options like plant-based plastics, biodegradable films, and recycled paper are gaining popularity. These materials offer an environmentally conscious alternative while still providing the necessary protection and functionality. Using sustainable materials helps brands appeal to eco-conscious consumers.
How to Make Chocolate Packaging?
Creating custom chocolate packaging involves several key steps to ensure that your product is protected, visually appealing, and aligned with your brand. From selecting materials to adding branding, here is a step-by-step guide to help you create the perfect packaging for your chocolate products.
Tools Needed
- Packaging materials (cardboard, paper, plastic, etc.)
- Scissors or cutting tools
- Glue or adhesive
- Printing materials for branding (optional)
- Ruler or measuring tape
- Decorative elements (ribbons, stickers, etc.)
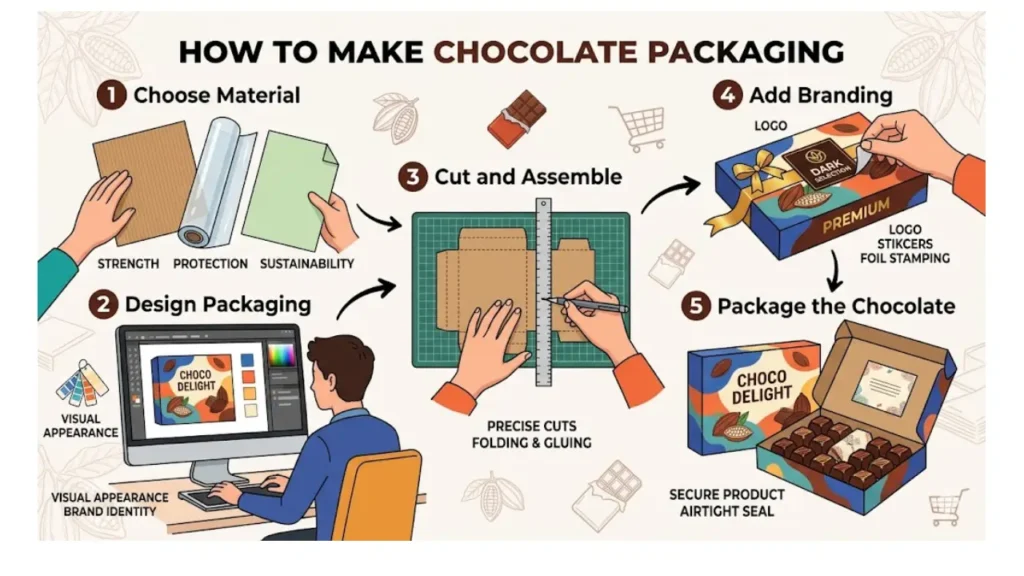
Step 1: Choose the Right Packaging Material
The first step is selecting the appropriate material for your chocolate packaging. Factors to consider include the level of protection, durability, and eco-friendliness. Common materials include paper, cardboard, plastic, and foil, each offering different benefits. Choose the one that best aligns with your product’s needs and your brand’s values.
Materials like cardboard are sturdy and provide a solid exterior, while plastics are moisture-resistant and keep the chocolate fresh. If sustainability is a priority, opt for eco-friendly materials such as biodegradable plastics or recycled paper. Ensure the material chosen can protect the chocolate during shipping and display.
Step 2: Design Your Packaging
Designing the packaging is crucial in attracting customers and conveying your brand identity. Think about your target market and the type of chocolate you are selling. Use colors, logos, and typography that resonate with your audience and match your brand’s overall aesthetic. Simplicity or luxury, the design should reflect the chocolate’s quality.
Make sure the design is both functional and visually appealing. Consider including product information, such as ingredients and nutritional details, while maintaining an attractive presentation. Branding is key, and your packaging should clearly convey what your brand stands for. Use professional graphic design software or hire a designer if needed.
Step 3: Cut and Shape the Packaging
Once the material and design are chosen, it’s time to cut and shape the packaging. Measure the material carefully using a ruler to ensure the right size. Cut the material to fit the chocolate product, making sure the edges are clean and neat. Accurate measurements will ensure that the packaging fits perfectly.
If you’re using cardboard, score the material to make folding easier. Ensure all folds align properly so that the packaging stays intact when assembled. Use cutting tools such as scissors or craft knives for precise cutting. Proper cutting and shaping prevent wasted materials and help create professional-quality packaging.
Step 4: Assemble the Packaging
Next, it’s time to assemble the packaging. This may involve folding the material, gluing or taping the edges, and adding any internal supports or inserts to keep the chocolate secure. Pay attention to the structure, ensuring that all parts of the packaging come together properly and that there are no gaps or weaknesses in the design.
If your packaging requires multiple components, such as a lid and base, assemble each part separately before joining them. Use adhesive or glue where necessary to ensure everything stays in place. Strong, secure packaging ensures the chocolate won’t be damaged during handling, shipping, or display.
Step 5: Add Branding and Graphics
Branding is a crucial part of chocolate packaging. Add your brand’s logo, tagline, and any other relevant graphics to your packaging. This can be done through printing directly on the packaging or using stickers and labels. Make sure your branding is clear and visible to help your product stand out on the shelves.
Consider adding additional decorative touches like embossing, foil stamping, or custom labels to give the packaging a more premium look. These small details can make a big difference in how your product is perceived. Ensure the branding elements match the design and color scheme for a cohesive look.
Step 6: Add Protective Features
To ensure your chocolate remains fresh and intact, add protective features to your packaging. This can include things like plastic inserts, cushioning materials, or protective wraps around the chocolate itself. These features help prevent the chocolate from being damaged during transit, keeping it safe until it reaches the consumer.
For individual chocolate pieces, consider using foil wrappers or clear plastic to protect them. For larger boxes or sets, consider adding an inner divider or tray to keep each piece secure. The added protection ensures that your chocolate stays fresh and appealing to customers, no matter how far it travels.
Step 7: Final Inspection and Packaging
Once everything is assembled and ready, conduct a final inspection of the packaging. Ensure that the product fits perfectly inside the packaging, that all branding is correctly applied, and that there are no defects. Double-check for any loose or unsealed edges that might compromise the integrity of the packaging.
Once you’re satisfied with the packaging, it’s time to seal it. This might involve using adhesive seals, shrink wraps, or simply closing the lid tightly. Be sure to store the completed packages in a cool, dry area to preserve the chocolate’s quality. Your packaging is now ready for distribution and sale.
Conclusion
In conclusion, creating chocolate packaging is a process that involves careful consideration of materials, design, and functionality. The right packaging not only protects your product but also enhances your brand’s image. By following the outlined steps, you can craft packaging that resonates with customers and makes your product irresistible.
Choosing the right materials and designs for your packaging is vital for a successful product launch. Eco-friendly and sustainable options can give your brand an edge while appealing to environmentally-conscious consumers. Proper packaging will also help your product stand out on store shelves and increase customer loyalty.
If you’re looking for wholesale chocolate packaging, Letai Packaging is your go-to source. We offer a wide range of customizable packaging solutions to fit your brand’s needs. Contact us today to create packaging that perfectly reflects your product’s premium quality and appeals to your target audience.
I have honed my expertise in creating high-quality packaging solutions, bringing both innovation and efficiency to the field. I am passionate about delivering exceptional results and contributing to sustainable packaging practices.
- What is a CBD Box? The Ultimate Guide - June 9, 2026
- Bangle Box Ideas: Inspiring Designs for a Clutter-Free Space - June 8, 2026
- What is a Bangle Box? The Ultimate Guide - June 8, 2026